
Review: ZWO's See Star S50, the affordable gateway to deep space
- Jun 7
- 7 min read
My journey into astrophotography didn’t begin with a DSLR, a star tracker, or a complicated rig of cables and counterweights. It started with a breakthrough moment: the first time I used a smart telescope.
I wasn't looking for a telescope. I received a daily email from an online retailer who focuses on novel and eclectic products from hand-held flame throwers and Samurai swords to, well, Stellina. The ad described it as a "fully portable smart observatory." I was instantly intrigued and when I researched and found the same unit at a reputable camera site I decided to go for it. I put my order in and eagerly awaited the arrival of this device that looked a bit like a suitcase, was less than a cubic foot in size and weighed around 25 pounds.

Stellina changed everything. It removed the friction, the steep learning curve, and the frustration that so often keeps people from taking that first step into astrophotography. You set it down, power it on, and within minutes it finds, tracks, captures, and processes deep space objects. I would just sit back and watch the universe unfold on my screen. Often, I'd set up a plan and simply go to sleep and wake up the next day to see what I captured.

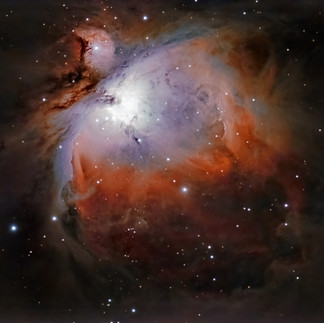
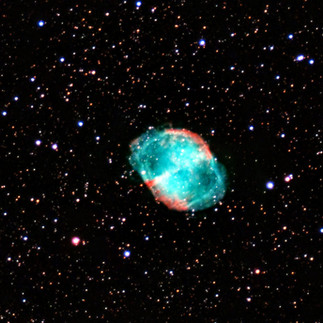
Stellina eventually offered features like support for a solar filter to view sunspots and CovalENS,, a novel and intuitive way to build "sky panoramas" or mosaics. Here are some of my favorite images I created with Stellina. Some of these images stacked literally thousands of 10 - 20 second exposures that would take my computer 2 - 3 days to process.


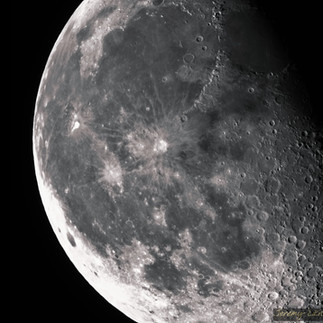
One thing I felt Stellina did a great job at was moon shots.
But there was a catch.
At several thousand dollars, Stellina wasn’t accessible to most people. It was inspiring, powerful, and transformative, but out of reach for many who were just curious about the night sky. Fast forward five years, and the landscape has completely changed. Enter the Sea Star S50.
You may also be interested in the newer See Star S30. which smaller, lighter, with a higher resolution and wider field of view. (and a little over $100 more dollars to buy). I don't plan to review that model. If you have experience with it, please post your thoughts in the comments section for this blog post.
Quick note about gear links:
Since 2022, Highpoint Scientific has been my main supplier of astrophotography gear. Their expert knowledge, excellent customer service and fast turnaround times are the reasons I keep coming back to them. I joined their affiliate program in 2026 and when you make a purchase through one of these links, you'll not only experience the best equipment, gear advice, and customer service, but I may also receive a small commission that I will immediately put back into the resources I use to make deep space accessible to everyone.
A New Era of Accessibility
The Sea Star S50 represents something genuinely exciting: the democratization of astrophotography.
Instead of costing thousands, it comes in at just over five hundred dollars. This price point, which is less than most people spend on their "traditional" camera gear, includes a telescope, lens, and the brains to drive it fundamentally changes who can participate in this hobby. It lowers the barrier to entry in a way that simply didn’t exist when I first started.
Of course, cutting cost isn't enough. It has to perform! How does it hold up in the field?
Small, Portable, and Effortless
One of the most impressive aspects of the S50 is its form factor.
It’s:
Compact (~5" diameter on most sides)
Lightweight (6.6 pounds)
Highly portable
This is a telescope you can toss in your car, carry to the beach, or take on a camping trip without a second thought. There’s no elaborate setup, no polar alignment rituals, and no hours spent troubleshooting.
Like Stellina, it embraces the smart scope philosophy:
Automated alignment
Built-in tracking
Integrated imaging
App-controlled experience
The result is simple: you spend less time fiddling with gear and more time actually observing and capturing the sky.
Here's a set up on my roof to keep it above the lights from neighboring homes:

See Star S50 Specifications
The specs are solid. To me, 250mm is a sweet spot for astrophotography, compared to wider angles that don't quite have all the details and or a long focal length that is great for planets but almost impossible to use for nebulae. It isn't the fastest or the slowest, but it certainly pulls its weight and then some!
Feature			S50						S30
Price			$549.00					$699.00
Focal ratio		f/4.9					f/5.3
Aperture			50mm						30mm
Focal length		250mm					160mm
Telescope design	Triplet refractor			Quadruplet refractor
Resolution		HD (1920 x 1080) 			4K (3840 x 2160)
				*4K available w/ stacking
Storage			64GB						128GB
Size				5.5" x 5.1" x 10.1"
Weight			6.6lbs					3.64lb (plus counterweight)
This my See Star S50 ready to go.

The process to use it felt very straightforward. I simply set it down on the ground, then turn it on. The rest happens in a phone application. I can, for example, ask it to "show me the moon." It will scan the sky and find the moon. The same goes for stars, galaxies, and nebulae. There is a built-in catalog that offers the best view and suggested viewing times (some faint nebulae require much longer viewing to achieve enough detail than others). You can override the exposure times depending on the target. Another nice feature is that during the day, it can simply act like an automatic camera.
Features That Matter
Despite its affordability, the S50 doesn’t feel stripped down. It has been a very valuable asset to me. It takes up hardly any space and is amazingly easy to set up in the field.
Notably, it supports filters, which opens the door to more creative and impactful imaging, especially when working with emission nebulae or under light-polluted skies. This is an important step beyond “entry-level toy” territory. It allows beginners to grow, experiment, and start learning the fundamentals of astrophotography without being overwhelmed. It also supports stacking. You can save the individual photographs that the See Star captures and then retrieve them to align and stack on your own.
With stacking, you can also take advantage of the data encoded across all those images to enhance and even increase the resolution of the shot.
Image Quality — Setting Expectations
Let’s be clear: this isn’t a replacement for a dedicated astrophotography rig.
You’re not going to produce:
Large-format gallery prints
Ultra-high-resolution deep sky mosaics
Competition-grade astrophotography
But that’s not the point.
What the Sea Star delivers is accessible wonder.
The images it produces are:
Clean
Colorful
Recognizably celestial
Immediately shareable
OK, enough talk. I'll let you decide for yourself. Here are a few targets with the info panel turned on so you can read the name of the target and the total exposure time.


This is the Crescent Nebula with just a few minutes of exposure at a dark site.

An over-exposed Jupiter with its moons. Not the See Star's fault: I increased the exposure time for some nebula shots and forgot to turn it back.

Finally, using the "scene" mode (like an ordinary camera) I captured this shot of a young bald eagle.

For the purposes of this review, these are the raw, unedited images. The stacked and processed ones look even better, but I think you'll agree that straight out of the box, the images are more than good enough to:
Draw gasps from friends and family
Shine on social media
Spark curiosity and excitement
And most importantly, they can ignite passion.
The Real Value: Igniting the Spark
This is where the Sea Star S50 truly shines.
Astrophotography has traditionally had a steep entry curve, both technically and financially. Many people never get past their initial curiosity because the barrier feels too high. The S50 changes that equation.
It gives people:
A first success
A first image of a nebula or galaxy
A first sense of connection to the cosmos
And those firsts matter.
Because for many, that spark leads to more:
Learning manual imaging techniques
Exploring advanced equipment
Investing in larger telescopes or dedicated setups
Or simply deepening a lifelong appreciation of the night sky
But wait, there's more
I'll dig deeper in some later "how to" or "in the field" videos with the See Star. I think of the device as a sort of spotter/lookout for me. I can use it to test the location of a target, preview the seeing conditions, and provide a fast feedback loop for beginners. Here are some other things I like:
The ability to tweak the exposure settings very easily
Availability of raw exposures to allow the user to stack and process them with their own workflow (in my experience, algorithms for live stacking must make compromises and trade-offs to deliver the image quickly)
A station mode so you can control the device from your Internet connection. This also makes it easy to move or download files over the network, but ...
If there's no network, just plug in the cable and browse like a thumb drive
An equatorial mode for longer exposures
OK, bottom line: I love it!
Final Thoughts
As a child, I wanted to be an astronaut right up until the day I wrote my first software program. To me, being able to take an idea and translate into something tangible that you could interact with was like magic. It took my breath away and I traded my space suit for a Commodore 64. Stellina gave me the ability to travel to the deepest reaches of space... without leaving home. And that was its own magic.
Today, Stellina carries on with their latest model, the Vespera Pro 2. This is an amazing piece of technology. Then again, so is the See Star at a much lower price! It's about access. It's about ease. And most importantly, it’s about inspiration.
The Sea Star S50 gives you a window into the universe.
For many, that’s all it takes to begin an incredible journey.
Please share your journey and/or experiences with a smart scope if you have used one!
Jeremy

Comments